The High Countries Professional Chimney Contractor
Installation Instructions- Single Wall Black Pipe
Intended use of product: Solid, Liquid and Gas fired appliances
Clearance to combustible: 18 inches
Recommendations & Limitations
- Every wood burning stove requires its own separate connector. Connect only one solid fuel burning appliance to a chimney. Do not connect an oil or gas burning appliance to a chimney venting a solid fuel burning appliance.
- Choose an appliance that is UL Listed.
- For installation and operation, Follow the stove manufacturer’s instructions and safety manual.
- Do not burn sea driftwood, treated lumber, or plastic
- Do not enclose single wall connector pip
- This connector is not a chimney. It must NOT pass through floors, attics, closets, walls, or ceilings
Installation Notes
- Use only ventis single wall black pipe and components. Do NOT mix with other manufacturer’s products. Do NOT install damaged pipes.
- While there is no Limitation to the total length of pipe that may be used. We recommend a maximum of 15 foot, not to exceed 20 foot.
- Single wall Black is used to connect a solid, liquid or gas fuel fired appliance to a factory built or masonry chimney
- The chimney must be installed and connected according to the applicable class A all fuel system, Forever flex, Armor flex, or Rhino Rigid Installation Instructions.
- In all cases, when pipe is correctly placed and aligned, be sure to securely attach all pipe sections to each other by fastening at least (3) #8 x ½” self drilling screws in every joint.
- A pipe hanger (Item:VSB-H) must be used for any horizontal run over 4 foot long and every 4 feet thereafter.
Ceiling Instructions
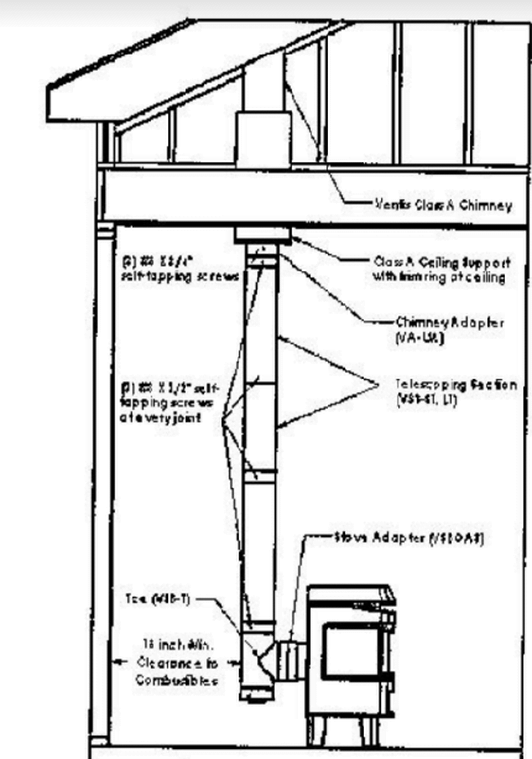
- Position the stove and floor shield to conform to the stove manufacturer’s clearance specifications. Position Appliance and chimney so as to avoid cutting and ceiling joists, roof rafters, or wall studs
- Install ceiling support box according to the installation instructions in your Ventis Class A Chimney Kit.
- Install a Ventis Class A Universal adapter in ceiling support box.
- If needed, Attach stove adapter (Item: VSB0AS), Tee (Item: VSB_T), or elbow (VSB0690F) to stove using at least (3) #8 x ½” self-drilling screws.
- Make sure Tee or Elbow align vertically with Chimney adapter at ceiling.
- Install adjustable Telescoping section (Item: VSB-LT) between the elbow, tee, AND the Chimney Adapter
- Fasten all the pipe sections together, INCLUDING telescoping section with at least (3) #8 x ½” self-drilling screws.
Through Wall Instructions
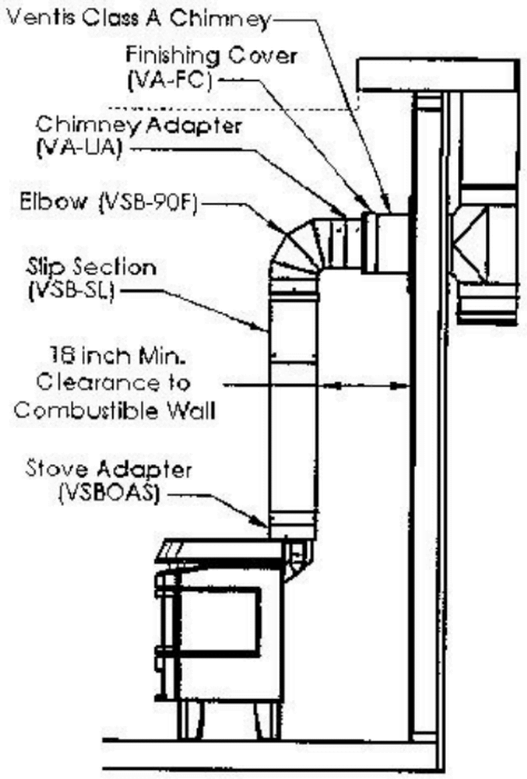
- Position Stove and floor shield to conform to the stove manufacturer’s clearance specifications. Position appliance and chimney so as to avoid cutting any ceiling joists, roof rafters, or wall studs.
- Install Wall Thimble (Item: VA-WPT) according to the installation instructions in your Ventis Class A Chimney Kit.
- Install the Universal Adapter (Item: VA-UA) to the Ventis Class A Chimney Pipe that has been securely installed through the Wall Thimble. Attach using (3) #8 x ¾” Self Tapping screws.
- Slide Finishing cover (Item: VA-FC) over the end of the Class-A Chimney Pipe.
- Attach stove adapter(Item: VSB0AS) to stove, If needed attach Tee (Item: VSB-T)
- Make sure the stove adapter and/or Tee align vertically and horizontally with chimney adapter.
- Install adjustable Telescoping section (Item: VSB-LT) between the elbow, tee, AND the Chimney Adapter
- Install 90 degree Elbow (Item:VSB-90F) at the top of telescoping section using (3) #8×1/2” self-drilling screws.
- Install a Telescoping section or a Fixed length connector pipe horizontally between elbow and Ventis Class-A Universal Adapter using (3) #8 x ½” self-drilling screws at each pipe joint.
- Fasten all the pipe sections together, INCLUDING telescoping section with at least (3) #8 x ½” self-drilling screws.
